More training flights and first theory lessons
Learning to Paraglide Day 3
As planned we headed out to the training slope first thing this morning at 8am as the wind was calm but would be getting stronger later on. A thunderstorm after lunch saw us heading to head-quarters to start the course theory, beginning with wing shapes, glide angles and stalls.
Disclaimer - Day 3
This is part 3 of my personal learning notes from the paragliding course at FlyManilla. These are my own observations and experiences for personal reference - they're not instructional material and may contain errors. If you're interested in learning to paraglide, I highly recommend taking a proper course with qualified instructors.
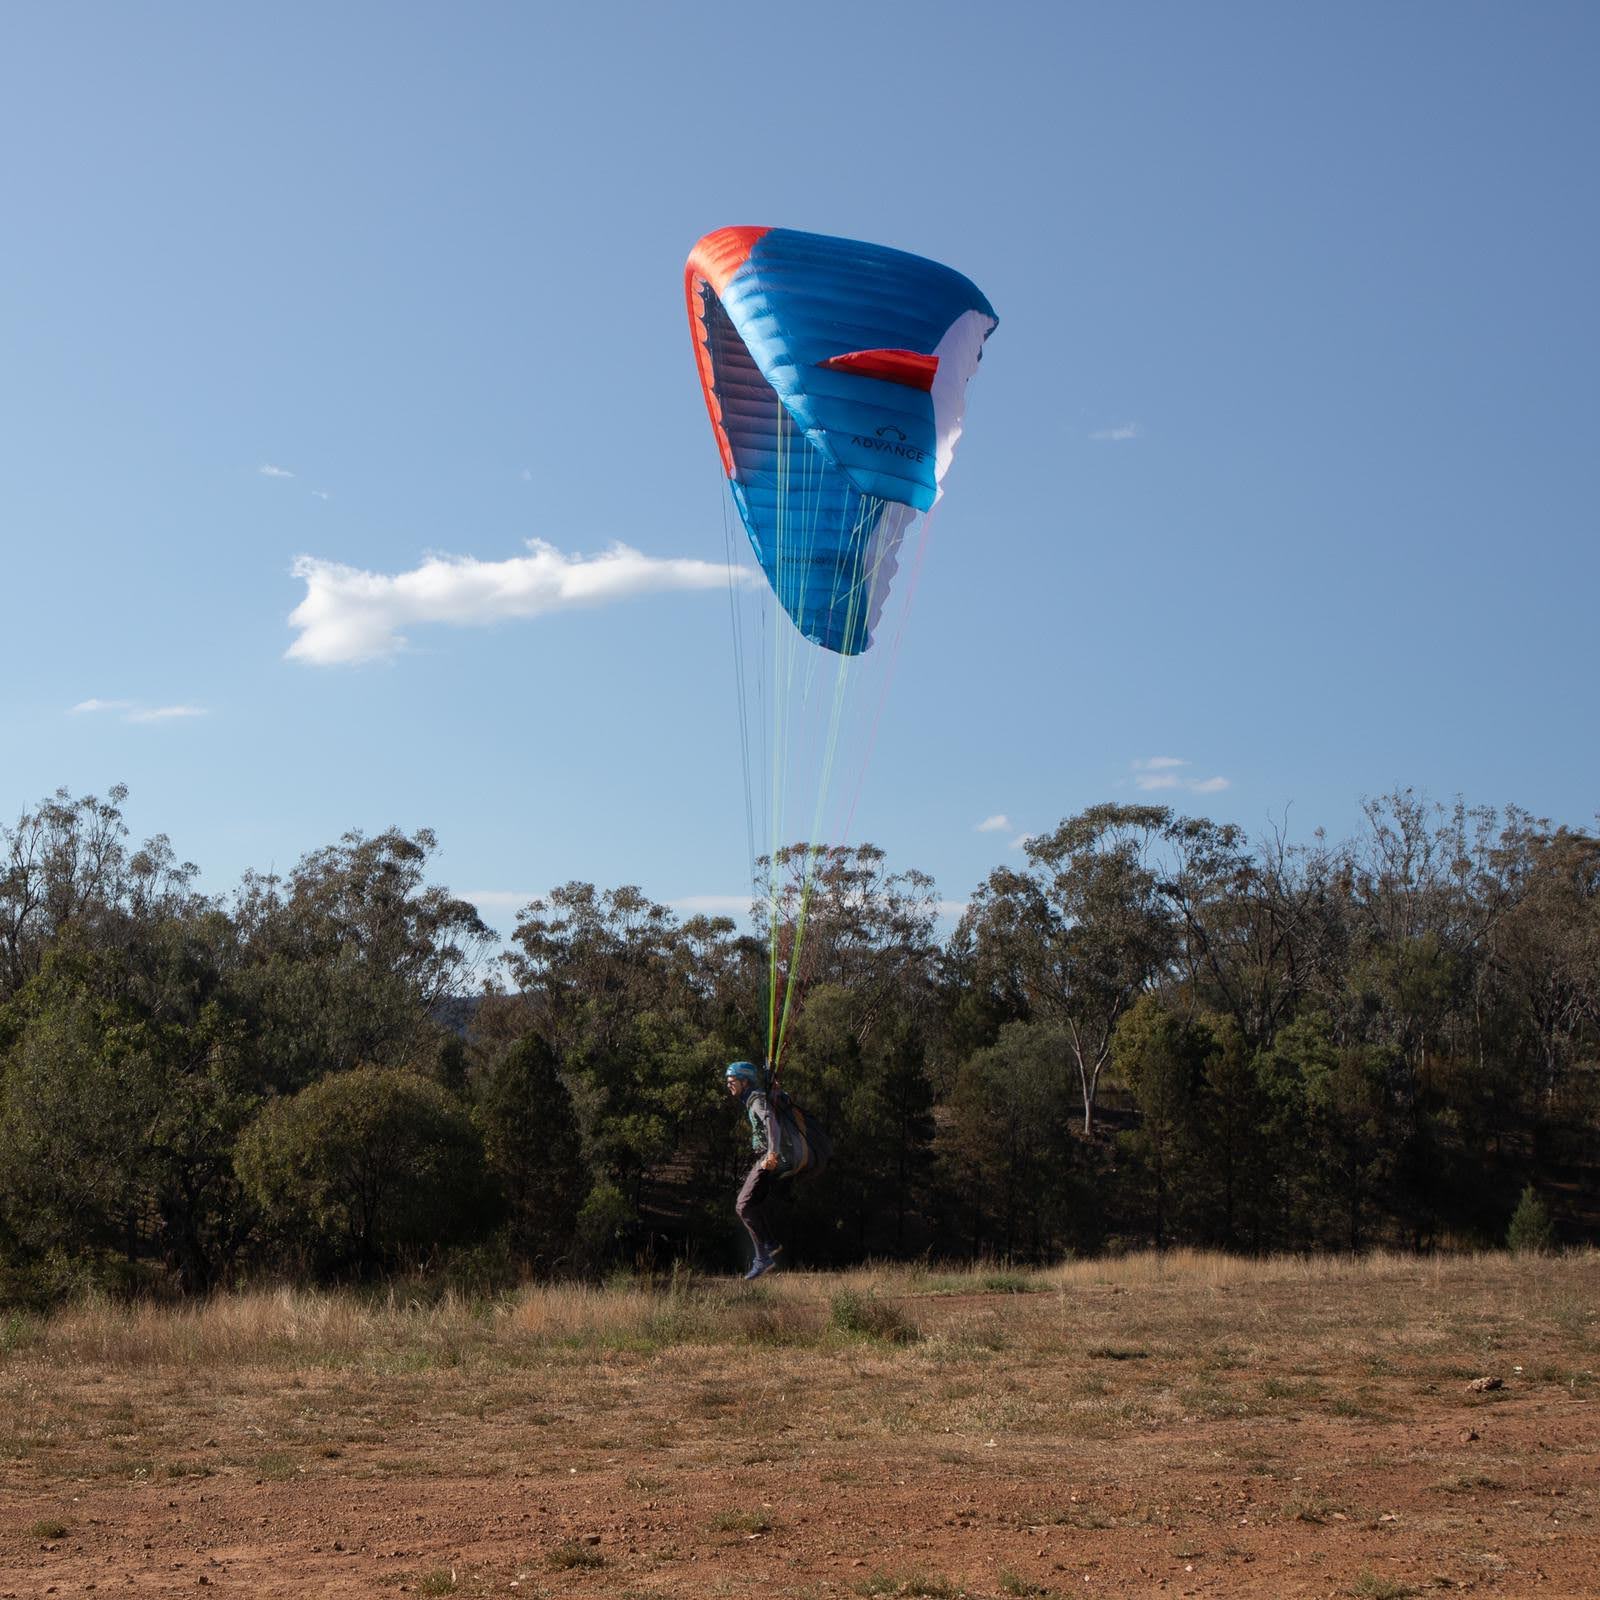
I was on a slightly bigger glider today (I’m at the top of the full weight range for the 26m2 Alpha 6 which I was on yesterday, and in the middle of the range for the 28m2 Alpha 6). The difference was quite noticeable - I didn’t need to run as fast to get off the ground, which also made it easier to avoid accelerating in front of the wing. Out of the 7 flights that I did on the training slope this morning (and one false start), these are the four things that stand out for me to learn:
1. NEVER ever unbuckle without taking the harness off completely
I’m so glad to have this experience at the training slope under proper supervision. Many of us are currently suffering from bruising on the upper thighs where the leg straps tend to dig and rub when running with the wing loaded. I thought I’d work to fix that today by wearing tracksuit pants, bunched up around my thighs, under my hiking over-pants. This worked pretty well, but after a few flights they were no longer bunched up for comfort around my thighs. Even knowing how careful you have to be, I thought I’d undo my waist strap to remind me the harness was open, then proceeded to do each leg: undo the buckle, bunch up the tracksuit pants, do the buckle up again. While I was doing the second leg, the basher - the old truck that takes us back up the hill - had stopped next to us. I was comfortable again, did up the waist strap and got in the truck with my glider. It was only a few minutes later when I was setup ready to fly that the instructor in charge helpfully asked, “so, what’s going on here?”, and I looked down knowing what I’d find - I’d not done up the second leg strap.
Never. Ever. Again. Nothing much would have happened in the training environment with only one leg strap done up - I would have unintentionally had weight on one side of the glider which would have turned slightly but I could have steered, but it was a reminder that I can never undo the harness without taking it off and going through my checks again.
I chatted with Karl, one of the instructors, about this later on while packing away the glider. Karl’s one of those people who is amazingly systematic and methodical about everything (it was Karl who demo’d packing the reserve chute on day 1). He emphatically recommends:
- Whenever you pick up a harness to carry it temporarily, put it awkwardly over one shoulder, not over both, so your brain never get used to putting it on without buckling.
- When you are actually putting your harness on, always go from start to finish - put it on your shoulders, leg strap, leg strap, waste strap, check buckles, finished. If you are interrupted, either don’t get interrupted, or take it off again until the interruption has passed and start again.
- Same for taking it off, never just undo a buckle for comfort - if you unbuckle one then the whole process through to harness off needs to be followed through.
- Always check all 3 buckles before taking off again, in case 1-3 fails somehow.
2. Always move forwards with the wing
I had one aborted launch on the training slope when I walked forwards to get the wing up with Bob controlling to keep it straight and it pulled backwards slightly with a small gust. Bob had said to let go of the A’s and start running but I’d paused slightly after being pulled back. When I did start running I could feel there wasn’t any pressure on my shoulders trying to hold me back and the intructors got me to stop and pull the wing down. What had happened was that the wing had been shooting up into position when I was pulled backwards, so when I paused, it continued past over my head to end up in front of me. I want to practise controlling this more in the ground handling field tomorrow.
3. Practise running with arms still
Although I did have a couple of nice flights on the training slope, I still managed to reproduce more porpoising than I was happy with. This is a combination of accidentally braking while running as well as not building up speed at the same rate as the glider.
4. Stay under the wing
During one launch I was pulled sideways by a small cross-wind but was focussed on running forwards and didn’t crab sideways with the pull. I did get lifted off the ground but the pendulum of the paraglider (with me at the bottom) was slightly off which I tried to correct with brake (or just did my normal thing of unintentionally applying brake, not sure). Once in the air, whenever the glider rolls like this with a small cross-breeze, just let the pendulum effect happen (ie. gravity pulls me down centering the paraglider again) rather than trying to correct with brakes.
We ended up only getting 7 or 8 flight in before it became too thermic with bubbles of warmer air lifting us up higher than is helpful on the training field.
Bonus session with Karl
Karl is often around when I’m doing something, so it’s the perfect opportunity to have an expert watch and correct. I’d come back from the training slope with my glider just in a concertina in the back of Godfrey’s 4WD as we didn’t have a stuff-sack available for it there, but there was one back in the HQ building. Rather than just stuff it in the stuff sack, as the name implies, I saw Karl nearby so just took the opportunity to have him watch and point out things that I could learn:
- Makes sense to have the concertina shape ready as the cell openings are facing up, so you can squeeze air out easily,
- Just keep squeezing air out and stuffing it in carefully,
- Watch your harness and helmut, which are ofter placed on top inside the stuff sack, ensuring you place them so any sweaty surfaces are away from the glider.
Pre-lunch theory session: airfoils, lift and drag
Given that the weather was pretty thermic by mid-morning, rather than go out for ground handling in the paddock (which could be a bit dangerous for learners like us), we headed into the HQ building to work through some more theory. I won’t detail standard things like the angle of attack of a wing, the chord, camber, relative air flow etc., which are all in the standard texts such as The Art of Paragliding (and any site about aerodynamics) but there were some particularly interesting things to note.
- For a paraglider, the angle of attack (the angle the chord makes with the relative airflow) must remain positive to keep the wing inflated and avoid a full frontal collapse. For us this means that we need to keep the glider above our heads, not moving in front of our heads (as I’d experienced above during one aborted launch).
- The old theory of lift based on the Bernoulli principle of a pressure difference between the top and bottom of the wing due to the extra distance that the air has to travel moving over the top of the wing (the Equal-transit theory) took a long time to be accepted as incorrect (see NASA or wikipedia). The Bernoulli pressure difference isn’t incorrect per se, but it only accounts for 5-15% of the lift so isn’t the main theory that we should be talking about for lift.
- The main force of lift is just the wing causing the mass of air to be pushed down as it moves forward, resulting in a Newtonian equal and opposite force upwards. This accounts for 85-95% of the lift. This is mainly controlled by the angle of attack - the angle the chord of the wing makes with the relative airflow.
- The shape of the wing also contributes to pushing the air down due to the Coanda effect - the tendency of fluids to follow the shape of a surface. Best example of this is when landing in a passenger jet and watching the slats on the leading edge and flaps on the trailing edge of the wing extend out to direct more air down without changing the angle of attack (ie. changing the stall point of the plane so it can travel more slowly while maintaining lift during landing). On a paraglider, this is why the minimum sink speed is found with a small amount of brake applied (similar to the flaps of a passenger jet).
We then went through the different types of drag and how they relate to paragliders:
- Parasitic drag is created by non-lifting parts of the paraglider, such as the lines, the body, flapping clothes etc. a. The biggest component of parasitic drag is Form drag - the shape of an object moving through air, b. A smaller but significant component of parasitic drag is the skin friction - how smooth the surfaces are - on things like hair or clothes on the pilot or the stitching of the wing itself,
- Induced drag is drag created by the lifting process itself. For example the powerful vorticies that are created at the wing-tips of both paragliders and passenger jets cause a large amount of drag even with newer wing tip designs.
After-lunch theory: Wings and Stalls
Unfortunately not long after lunch we had a large thunder storm roll through meaning that those people who were planning a second tandem (to work on a few points) were unable to go and the paddocks were wet so we couldn’t take the old gliders out to learn reverse launch techniques. Instead, we headed back into the head-quarters and worked through more of the background theory for the certification exam (the Sports Aviation Federation of Australia also has a good study guide available).
- Cross-port venting: the vents between the cells of a paraglider which allow the pressure to equalise between the cells, so it’s much easier to inflate on launch and more importantly re-inflate after a collapse.
- Pendular stability: the weight of the pilot in a paraglider ensures stability for both the roll-axis and pitch axis. If the paraglider begins to roll due to a gust or breeze, the best thing to do to stabalize is nothing - just let gravity do its thing, rather than applying brakes or shifting weight.
- Pitch stability: just like pushing a kid on a swing, small pushes with the right (or wrong) timing can have a large effect. If the glider goes backwards behind your head (ie. when entering a thermal) put your hands up to let the wing come forward naturally again. If you instead brake, it can be like holding a slingshot back so that when you then release the brakes the glider swings forwards much faster, potentially overshooting in front for a frontal collapse. If the wing goes in front, brake slightly to bring it back. This can all be practised and experienced during ground handling.
Though pendular stability is your friend when up high, it can be your enemy near the ground.
Wing shapes and glide angles
- Safer gliders generally have a lower aspect ration (more boxy) while competition gliders have a higher aspect-ration (long, thin wings). A higher aspect-ration basically creates more leverage near the tips of a wing so that the wing can roll (or collapse) more quickly when experiencing unequal forces. But it also means that the pilot gets more direct feedback and can feel when the wing tip goes through a thermal and turn towards it, for example.
- The glide angle (really glide ratio) is just the horizontal distance the glider will travel compared to the vertical distance at its trim speed (speed it glides with no brakes). The Alpha 6 is about 10:1 (ie. from 1km high, it’ll travel 10kms in no wind). High performance paragliders are around 12 or 13:1 (30% improvement). A sailplane can be above 50:1.
- In reality, the glide ratio is also affected by the wind direction and speed, brakes applied as well as any lift or sink you pass through.
- 0% brakes gives you the best glide speed or trim speed. You’ll travel around 40km/h horizontally and around 1.1m/s vertically and get the best bang for your buck for distance.
- 20% brakes (around the carabiner level) gives you the minimum sink speed, you’ll be travelling slower horizontally at around 30km/h but also slower vertically at around 1m/s due to the shape of the wing pushing more air down.
- 50% brakes and you’ll be slowing down and also creating more turbulance-induced drag, so travelling around 30km/h horizontally and around 3m/s vertically.
- The profile of the wing can be described using the camber.
- An under-surface curvature in a wing reduces forward pitching speed, which is very helpful for a paraglider.
Stalling and wing tucks
The definition of a stall: when the wing reaches a critical angle of attack where the air changing direction is reduced to the point that the lift produced no longer counteracts the weight. The point at which your glider stalls can be affected by number of obvious and non-obvious factors, such as:
- reducing the air speed by applying the brakes which reduces the amount of air being pushed down so the wing will stall at a smaller anger of attack
- a higher angle of attack can result in less flow over the wing due to turbulance which reduces the amount of air being moved downwards
- body weight - a heavier pilot will require more air being pushed down resulting in a stall point at a lower angle of attack
- wing loading - the weight being felt by the glider will change when turning due to the pilot being accelerated in an arc which therefore requires more air being pushed down to counteract the force, leading to a stall point at a lower angle of attack.
- porosity of the upper surface of the wing can mean air leaks through so that the flow of air over the wing is disturbed and doesn’t follow the surface leading to less air being moved downwards and there fore a stall point at a lower angle of attack.
The angel of attack affects the lift, drag and airflow in different ways:
- The lift increases slightly when increasing the angle of attack to a certain point (minimum sink, usually 20% brake) but then decreases after that as the air above the wing becomes much more turbulent causing less lift and more drag.
- The drag increases increases continuously as the angle of attack increases.
- The airflow over the wing goes from smooth/laminar through to rough as the angle of attack increases.
Drag is defined as the force resulting from the disruption of laminar air flow. Drag is the result of changes in airflow.
How does this all apply to us flying a paraglider? A frontal collapse or tuck normally happens only with a negative angle of attack but if you’re flying with a low angle of attack (ie. no brakes) then turbulent wind can result in a negative angle of attack for part of the wing, causing it to tuck under. In turbulent weather you might apply 0-20% brakes but don’t go past the carabiners (30%) for long as the same turbulence can push the front up and effectively stall.
Need to remain active: if the wing goes back, hands up, if the wing goes forward, apply a bit of brake.
Tomorrow if the weather plays along we’ll be doing our first solo high flights!